JobWizard Utility
JobWizard is for creating and editing print jobs for the microarrayer.
NOTE: Sample pick-up, washing-drying and prespotting operations can be disabled. If some operation is
disabled the corresponding step dialog disappears from the JobWizard sequence.
Step 1.
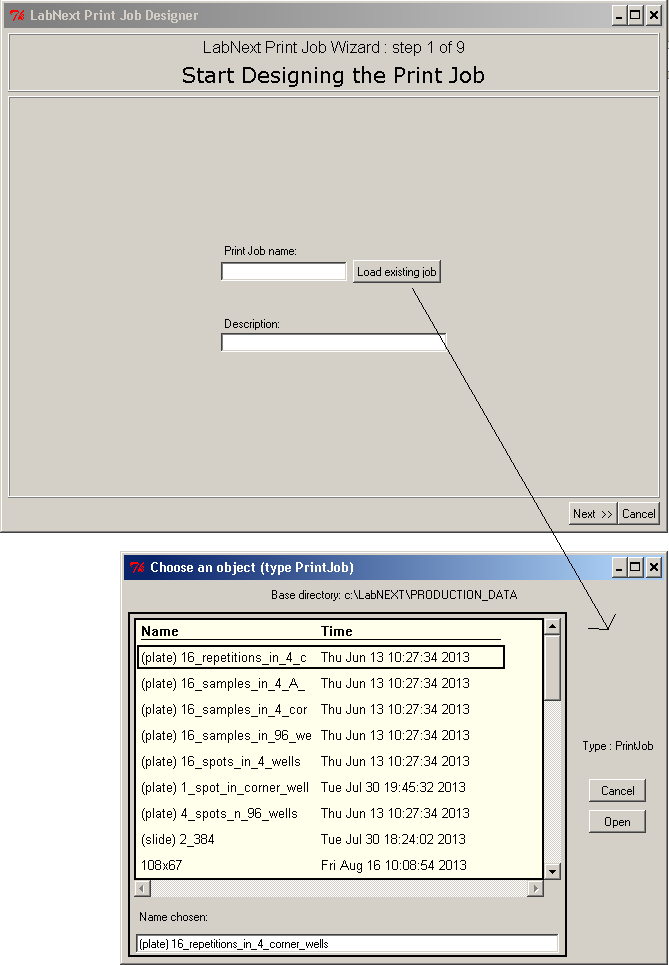 For creating a new print job type its name in the "Print Job Name" field and click Next button.
For loading an existent print job click "Load existing job" button.
For creating a new print job type its name in the "Print Job Name" field and click Next button.
For loading an existent print job click "Load existing job" button.
Step 2.
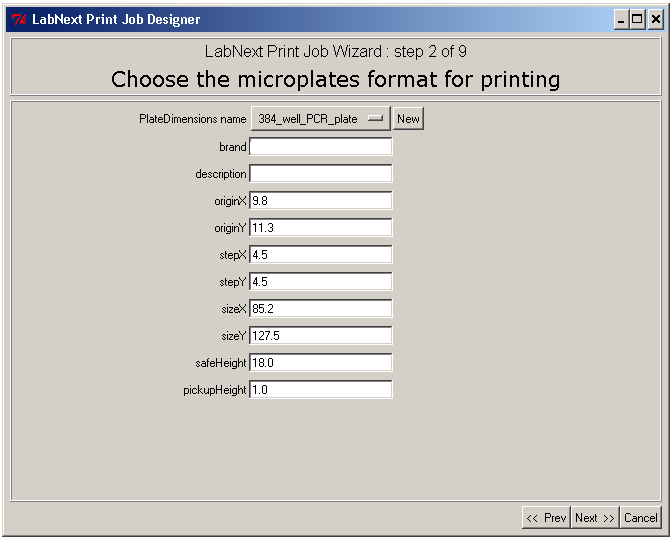 PlateDimensions Name - name of the source plate specification
brand - Free format text
description - Free format text
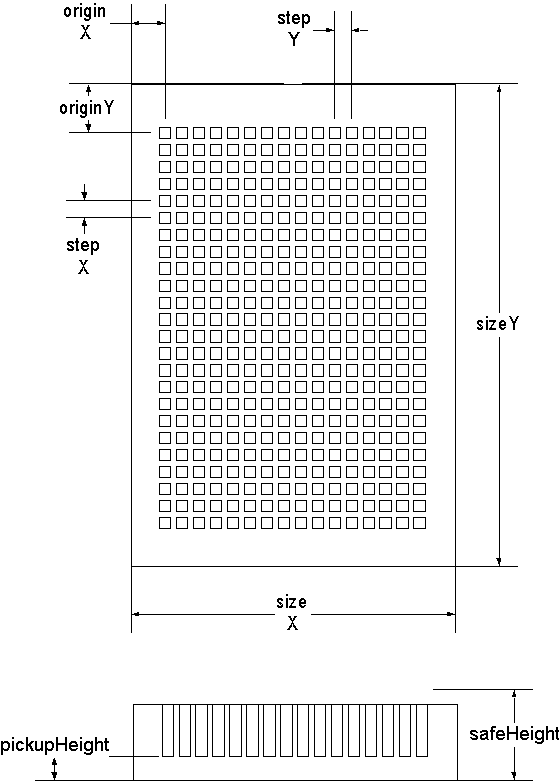
originX
originY - X, Y coordinate of the center of the far left corner well of the plate
stepX
stepY - X, Y distance between wells. 384-well plate - 4.5mm. 96-well plate - 9mm
sizeX
sizeY - X, Y size of the plate footprint
safeHeight - Vertical ( Z ) distance for transition of the pin between wells, measured from the
surface of the plate holder to the pin tip.
pickupHeight - Vertical distance for sample pickup, measured from the surface of the plate holder to
the
pin tip.
File system location: C:\labnext\PRODUCTION_DATA\PlateDimensions
PlateDimensions Name - name of the source plate specification
brand - Free format text
description - Free format text
originX
originY - X, Y coordinate of the center of the far left corner well of the plate
stepX
stepY - X, Y distance between wells. 384-well plate - 4.5mm. 96-well plate - 9mm
sizeX
sizeY - X, Y size of the plate footprint
safeHeight - Vertical ( Z ) distance for transition of the pin between wells, measured from the
surface of the plate holder to the pin tip.
pickupHeight - Vertical distance for sample pickup, measured from the surface of the plate holder to
the
pin tip.
File system location: C:\labnext\PRODUCTION_DATA\PlateDimensions
Step 3.
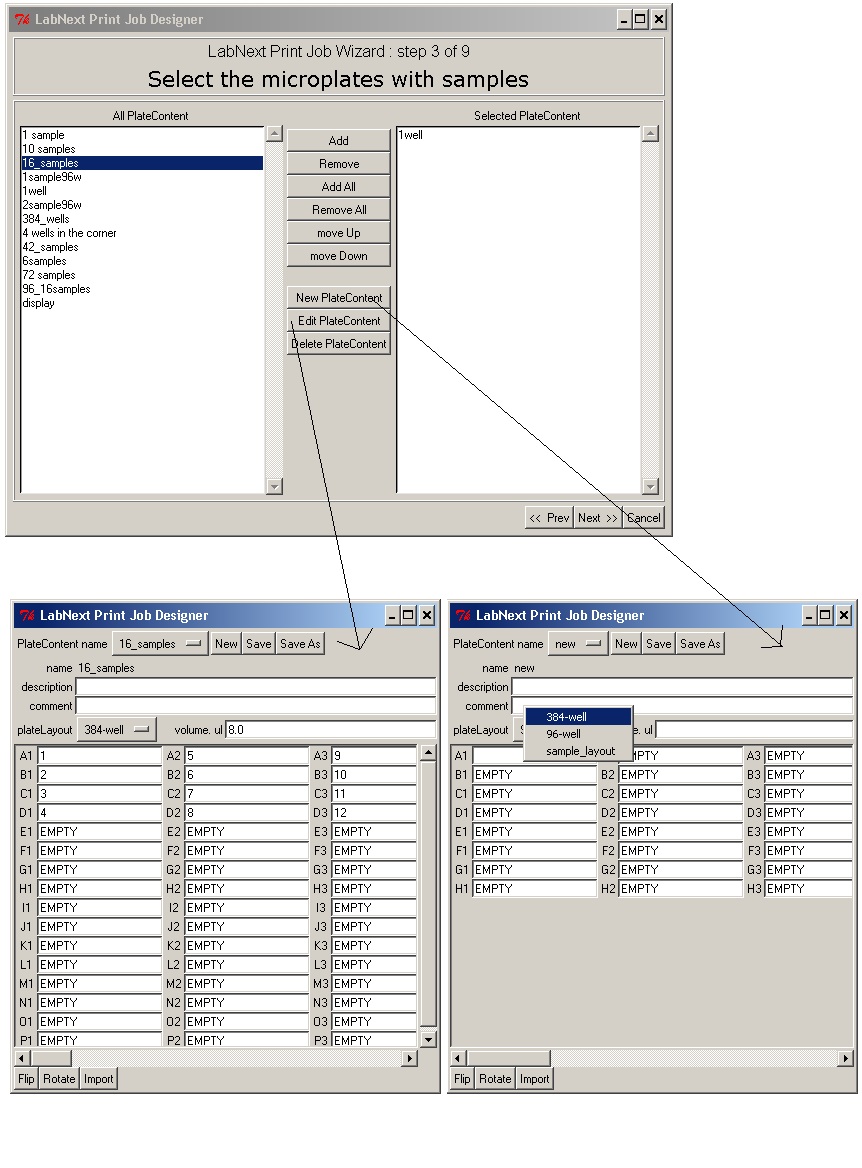
Plate Content Dialog
Plate Content name - Name of the source plate and its content in the database.
description - free format description
comment - free format text
plateLayout - layout of wells (96, 384 or any custom layout)
volume - volume of the plate well
wells array - content of each well, free format text. "EMPTY" value is reserved for marking wells
the pin will not pick-up from.
File system location: C:\labnext\PRODUCTION_DATA\PlateContent
Plate Layout Data Stucture
(no GUI access)
Pre-formatted data file for defining layout of the wells.
description - Name of the plate layout.
wellsX
wellsY - number of wells in X and Y directions.
File system location: C:\labnext\PRODUCTION_DATA\PlateLayout
Step 4.
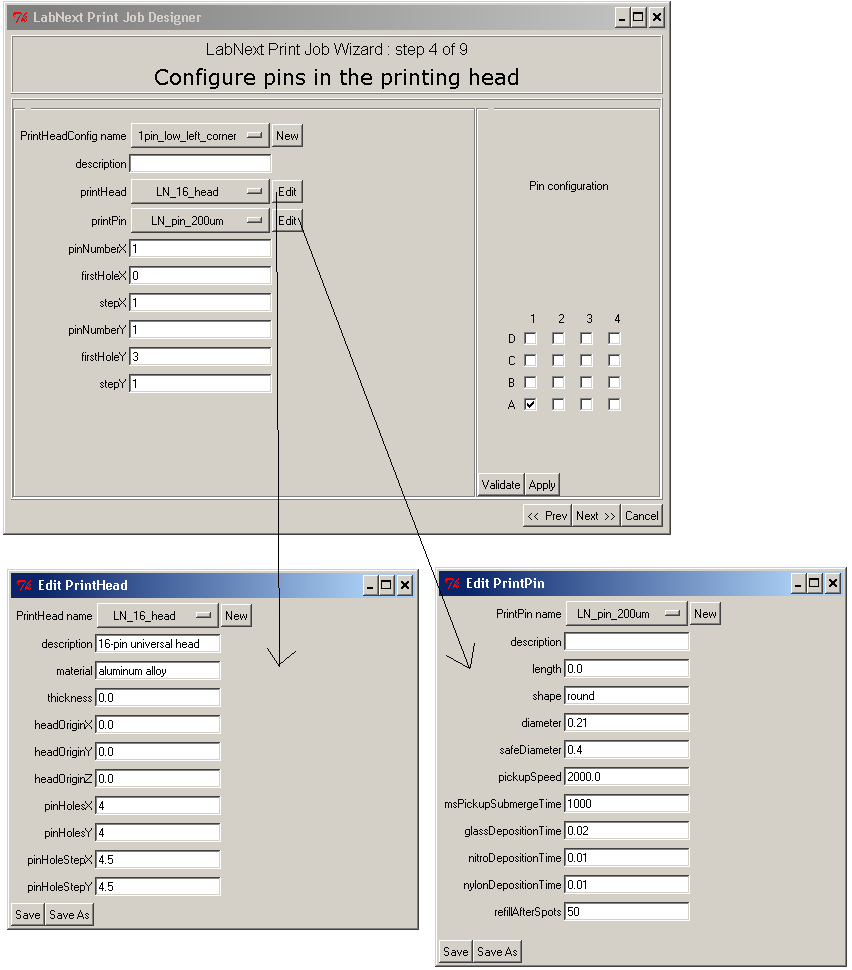
Print Head Configuration Dialog
description - Free format text.
printHead - Name of the print head used in this configuration
printPin - Name of the pin used in this configuration
pinNumberX - Number of pins along X axis.
firstHoleX - Index of the first hole pins installed along X axis (0,1,2,3).
stepX - Interval between pins along X axis. 1 - every hole, 2 - every other hole, 3 - every third hole.
pinNumberY - Number of pins along Y axis.
firstHoleY - Index of the first hole pins installed along Y axis (0,1,2,3).
stepY - Interval between pins along Y axis. 1 - every hole, 2 - every other hole, 3 - every third hole.
File system location: C:\labnext\PRODUCTION_DATA\PrintHeadConfig
Edit Print Head Dialog
description - Free format text.
material - Free format text.
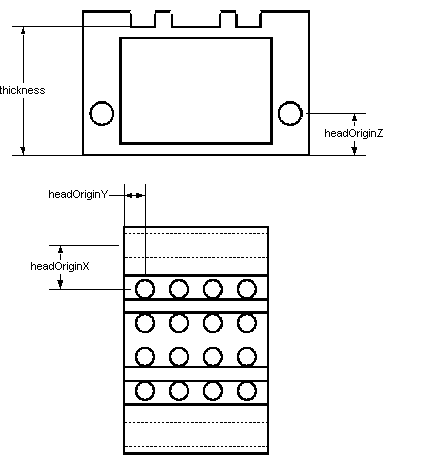
thickness - See image below. The value is relative.
headOriginX - See image below. The value is relative.
headOriginY - See image below. The value is relative.
headOriginZ - See image below. The value is relative.
pinHolesX
pinHolesY - Number of holes in X and Y directions.
pinHoleStepX
pinHoleStepY - Distance between holes in X and Y directions.
File system location: C:\labnext\PRODUCTION_DATA\PrintHead
Edit Print Pin Dialog
description - Free format text.
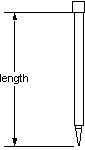
length - See image below.
shape - shape of the pin tip "round" or "squared". Imported in the output file, defines shape of data
extraction zones.
diameter - Pin tip diameter in millimetres. (Put 0.3 for 300 um pins)
safeDiameter - Diameter of resulting microarray spot. Set to prevent spot overlapping.
pickupSpeed - parameter is set in TIME units ( i.e. 1000 msec ). After the pin descends into the source
plate well it stays in the lowest point for the time defined by the "msPickupSubmergeTime" parameter.
After this time it ascends from the well in three upward increments to allow the liquid filling the pin.
The parameter value sets the time of the gradual pin accent from the well. Each increment takes 1/3 of the
"pickupSpeed" value.
This is done in case the pin tip hits the bottom of the well in its lowest point and blocks the capillary.
Gradual ascend opens the capillary and gives time to uptake the sample.
msPickupSubmergeTime - Time the pin stays in the lowest point during sample pickup.
glassDepositionTime - Time the pin stays in its lowest point during deposition on substrate registered with
"material" parameter set as "glass". (See Substrate Dialog below)
nitroDepositionTime - Same as above for substrate registered with "material" parameter set as "nitro".
nylonDepositionTime - Same as above for substrate registered with "material" parameter set as "nylon".
NOTE: Nitro(cellulose) and Nylon membranes are absorbing materials. Long deposition time may result in
spots significantly larger that the pin tip diameter.
NOTE: Effective deposition time depends not only from above parameter, but also from the distance the head
travels down after the pin hits the glass and the vertical speed of the head.
refillAfterSpots - Defines refill settings. Refill is when the pin returns in the same source well after
certain number of spots to replenish the amount of sample. Refills are used when printed arrays contains
more repetitions of the same sample than pin can make from one pickup (depends on pin type, substrate
surface absorbtion and printing buffer properties).
Value "0" - pin never returns to the same well
Values "1 and higher" - pin returns to the same well after defined number of spots.
Refill can be done with or without pin washing. See parameter "Wash/dry before refill" in the Step 8
section.
File system location: C:\labnext\PRODUCTION_DATA\PrintPin
Step 5.
For microarray pattern terminology used in this section please refer to
Microarray Geometry document.
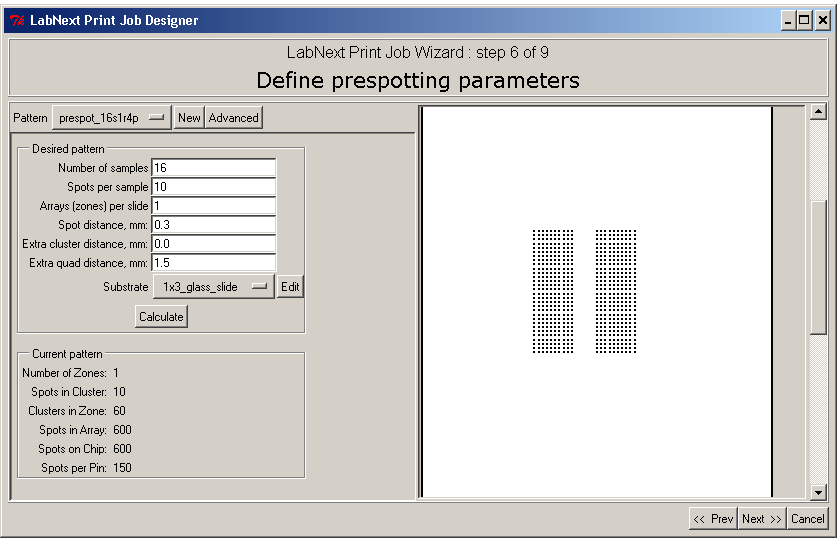
Choose Print Pattern Dialog ( Automated Pattern Generation )
Desired Pattern Pane
Settings in this dialog are required for automated pattern generation. Microarray patterns are generated
with following conventions:
- Work area of the substrate is divided into equal areas vertically. There are as many vertical areas
as "Arrays (zones) per slide" setting.
- Arrays are placed in the center of each area.
- Clusters are generated only in a horizontal linear format: N x 1
x x x x
Autogenerated patterns can be later edited in the Manual Mode if necessary.
Number of samples - Total number of samples in all source plates included in this print job.
Spots per sample - Number of repetitions (spots) for each sample on the array.
Arrays (zones) per slide - Number of identical arrays (zones) on the substrate.
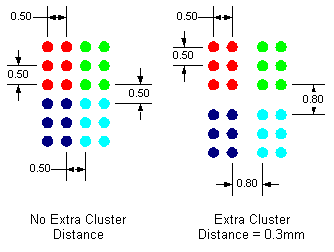
Spot distance, mm - Distance between spots in clusters ( spots from a single pickup )
Extra cluster distance - Additional distance between clusters ( see image below ). If the parameter
is set to "0" clusters will be placed in the way that spots keep same distance across the entire quad.
Adding an extra distace will produce a gap between clusters in the quads.
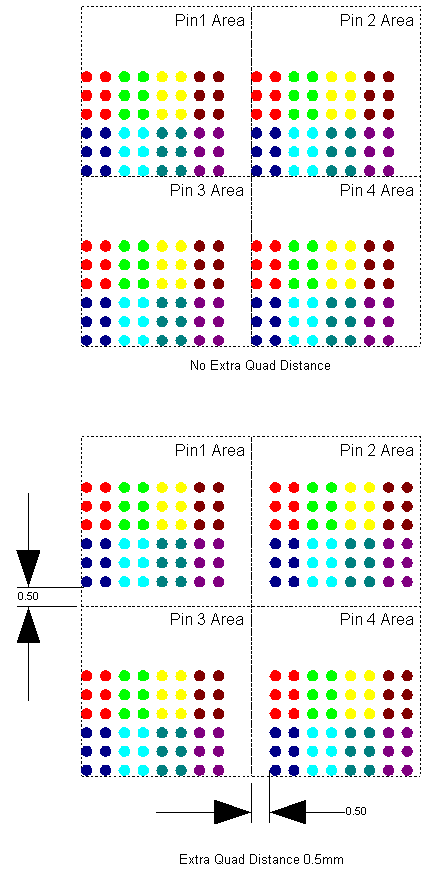
Extra quad distance - Additional distance between Quads. Similar to the previous parameter. ( see
image below )
Substrate - Substrate used for printing and access to the Edit Substrate dialog.
Calculate - Starts automated array placement algorithm.
Current Pattern Pane
Array statistics. No editing.
Number of Zones - Number of identical arrays (zones) on the substrate.
Spots in Cluster - Total number of spots in clusters ( number of repetitions of each sample ).
Clusters in Zone - Number of clusters in the Array.
Spots in Array - Number of spots in the Array.
Spots on Chip - Number of spots on the entire substrate.
Spots per Pin - Number of spots each pin produced on the entire substrate.
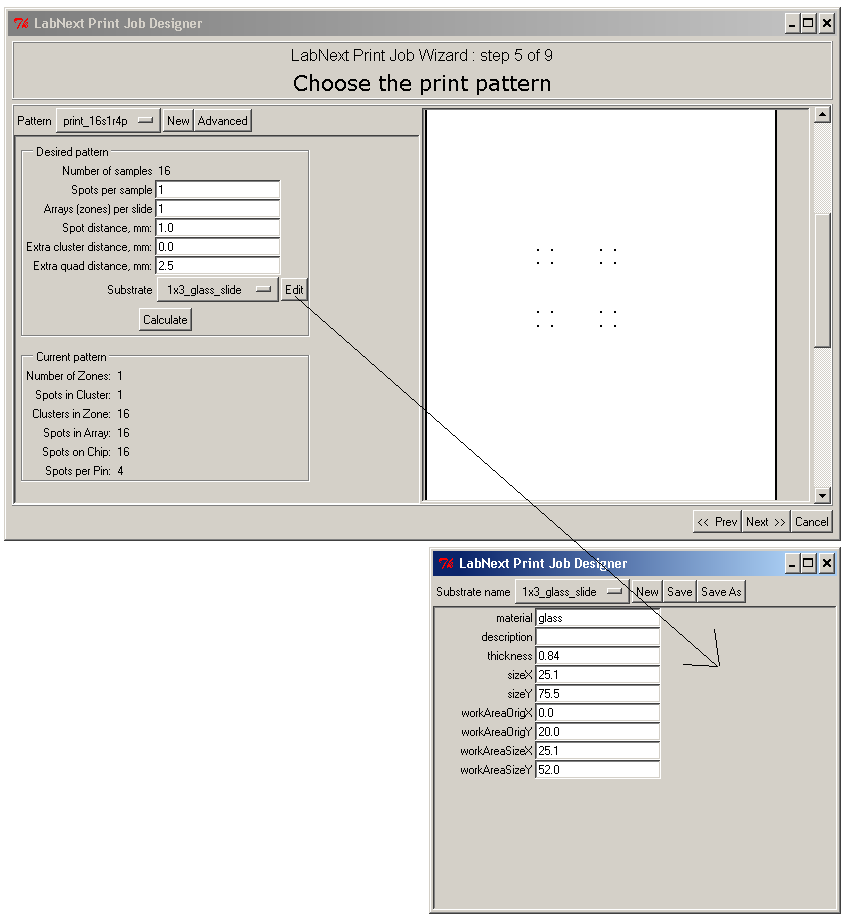
Edit Substrate Dialog
material - Substrate material. Predefined values "glass", "nitro", "nylon". The values define which
contact time will be used. See "Edit Print Pin Dialog" parameters "glassDepositionTime",
"nitroDepositionTime", "nylonDepositionTime".
description - Free format text.
thickness - Substrate thickness.
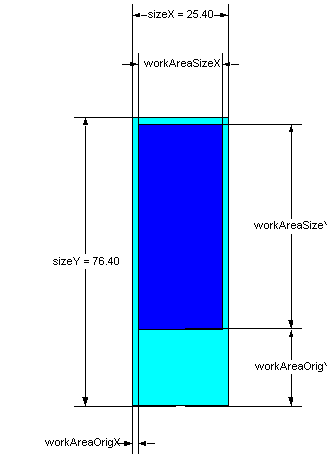
sizeX
sizeY
workAreaOrigX
workAreaOrigY
workAreaSizeX
workAreaSizeY - Parameters define overall size of the substrate, siza and position of the work area ( see
image below )
File system location: C:\labnext\PRODUCTION_DATA\Substrate
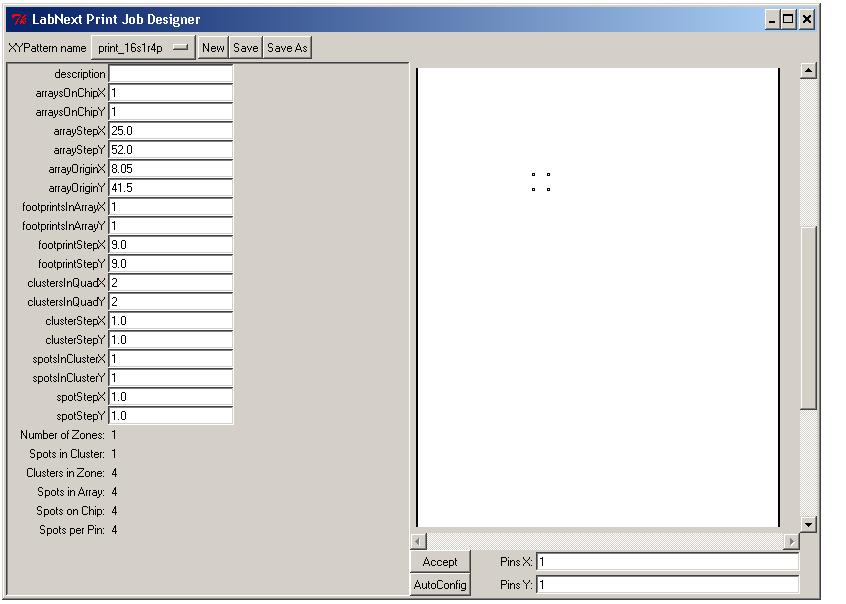
Choose Print Pattern Dialog ( Manual Pattern Generation )
For parameters shown below please refer to Microarray Geometry
document.
Editing microarray parameters manually provides greater flexibility in defining microarray layout and
placement.
Step 6.
Prespotting is making a series of spots immediately after sample pickup on a dedicated substrate in order
to print out excessive liquid and start printing consistently on the microarray substrates.
Number of prespotting spots depends on the pins type and size, printing buffer and substrate properties.
Printing pattern used for prespotting can be different form the actual microarray pattern.
All parameters for defining the prespotting pattern are identical to the microarray pattern described above.
Prespotting pattern can be only with 1 Zone. The software will display a warning message is number of zones
set for more than one.
General recommendation for prespotting patterns.
- Use multiple repetitions ( spots per sample or spots in cluster. )
- Use linear cluster patterns.
- Make Extra Cluster distance as big as possible. Prespotting spots tend to be bigger but spots can run
into each other within the clusters. They are of the same sample and wont contaminate. Clusters
should not run into each other. It means cross-sample contamination.
NOTE: Prespotting can be disabled if necessary.
Refer to the following section of the Documentation: Process Parameters Settings File
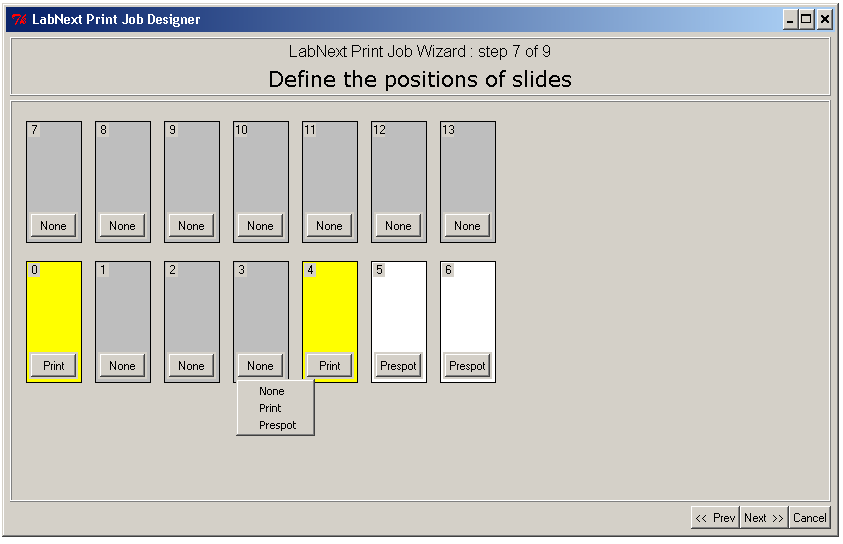
Step 7.
Define which slide holders are used for prespotting substrates, microarray substrates and which are empty.
If there are not enough prespotting substrates to accommodate all prespotting spots, the software will
pause job execution and prompt for replacing prespotting substrates.
Step 8.
Process parameters for print cycle.
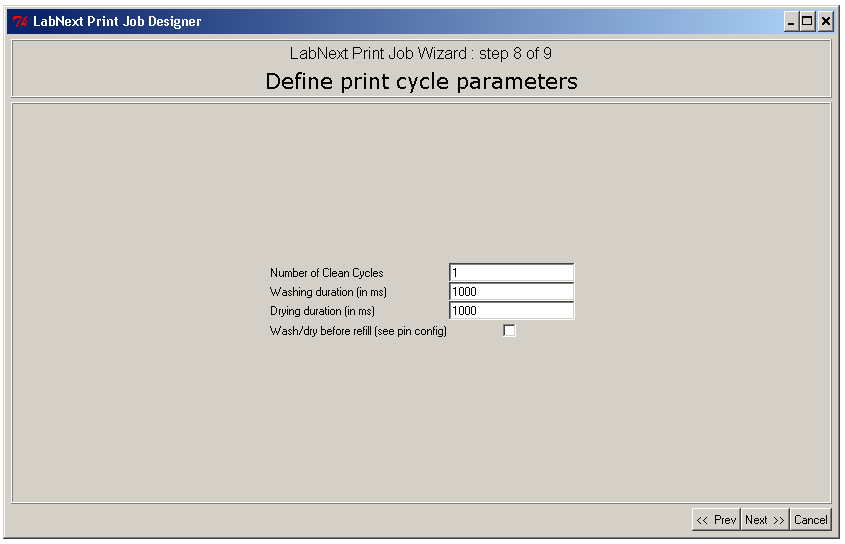 Number of Clean Cycles - Number of wash-dry repetitions after each sample. Use extra clean cycles
for hard to clean substances.
Washing duration (ms) - Duration in milliseconds for washing.
Drying duration (ms) - Duration in milliseconds for drying.
Wash/dry before refill - Refill is picking up the same sample after certain number of spots defined
in the Edit Print Pin dialog ( Step 4). Although it is not necessary to clean the pin before picking up the
same sample (no risk of cross-sample contamination ), some conditions may require cleaning to prevent
sample residue drying out on the pin surface during transition or visa-versa excessive sample accumulation
in the pin if it is not printed out before the refill.
NOTE: Washing / Drying cycle can be disabled if necessary.
Refer to the following section of the Documentation: Process Parameters Settings File
Number of Clean Cycles - Number of wash-dry repetitions after each sample. Use extra clean cycles
for hard to clean substances.
Washing duration (ms) - Duration in milliseconds for washing.
Drying duration (ms) - Duration in milliseconds for drying.
Wash/dry before refill - Refill is picking up the same sample after certain number of spots defined
in the Edit Print Pin dialog ( Step 4). Although it is not necessary to clean the pin before picking up the
same sample (no risk of cross-sample contamination ), some conditions may require cleaning to prevent
sample residue drying out on the pin surface during transition or visa-versa excessive sample accumulation
in the pin if it is not printed out before the refill.
NOTE: Washing / Drying cycle can be disabled if necessary.
Refer to the following section of the Documentation: Process Parameters Settings File
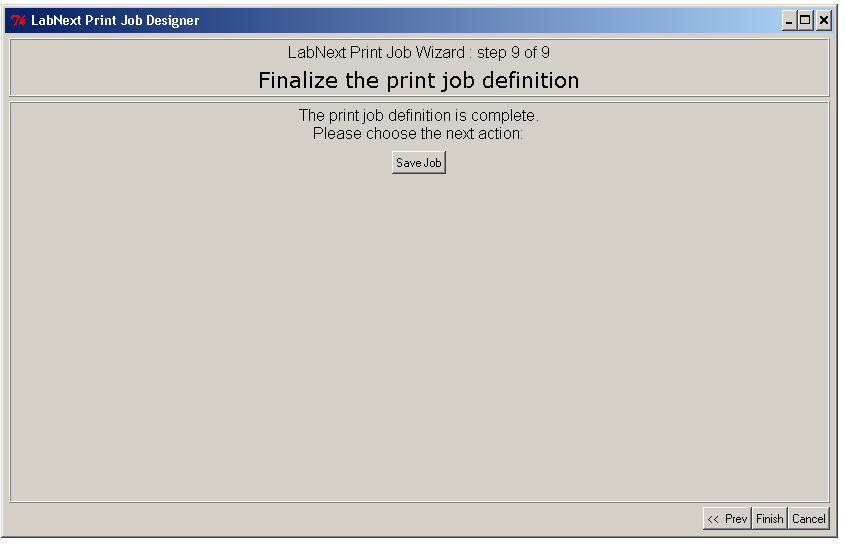
Step 9.
Saving a new or modified Print Job.